Hi Everyone!
As I know many of you are heading out just about now...at 12:30 AM to go do some Christmas/Holiday Shopping. Some of you are already out and about.
I beg of you all PLEASE be courteous. Don't punch people in the face. Don't trample on the workers. I don't want to hear about any deaths or injuries this year. There is NO item in this world that is worth it. Plus just be polite to workers and fellow shoppers. Don't get lost in the frenzy that is Black Friday.
People wonder why many retail people end up sounding bitter and mean and you end up complaining about them. It's because the people that came before you were mean and nasty to them and treated them horribly.
Come on people give a smile say thank you for your work. Make them feel appreciated.
And to the workers of Black Friday I ask you. Even though they yell at you, threaten you, even lean over the counter in an attempt to intimidate you. Be nice give a smile even though you're tired and probably upset at the last few people who treated you wrongly just give a smile. If the people who ignore my pleas decide to keep on being rude and violent over unnecessary items just forgive their ignorance and ill manners. Just mentally count down until you can escape and go home and get some actual rest.
And stores for shame on you for making people come in so early and not fully enjoying their holiday.
I want things to go back to how they were. Holidays were sacred! Everything shut down! Only essential places were open like pharmacies and hospitals. It's a time for friends and family to be together, not marketing ploys!
I can say these things because I've been on both sides I've been a shopper and a worker. Please don't comment and tell me I know nothing.
Once again BE COURTEOUS!!
Thursday, November 22, 2012
Friday, November 16, 2012
Dog Collars for Etsy
Hi Everyone!
I know I have no followers what so ever....ya I know I don't I'm not popular what can I say.
But I thought I'd let everyone know that in a week or so I will have some things posted on my Etsy shop. I am pleased to inform you that they are decently priced as well.
I am going to be selling some dog collars.
I did applique and bead work on them.
They will be selling for $10. and shipping for them is $2. within the United States.
Here's what three of them look like.

They're an excellent deal!
If you were to go to Walmart to purchase the collar alone (completely plain) you'd be paying over $6.
And if you were to purchase a decorated one from the store you'd be paying over $15.
So it's a deal ^^
They are 16 inches in length and should fit a dog approximately the weight of 18 pounds to I'd say about 30 pounds.
Now if you are concerned that the flowers won't stay on. I can guarantee they will unless your sweet little puppy is a chewer. My dog Sasha has a few of them I've made in the past 2 years and only one has come apart and that was due to her going through a chewing phase she helped them loosen up. The one she wears now is over a year old and still holding up.
Here's a picture to show you. This is the one she wears now.
I had to hold her fur back...she's extra fluffy so it hides sometimes ^^;

So hope some of you guys are interested.
These collars would make great Christmas presents for your puppy
Please comment or contact me if you have any questions
Thank You! ^_^
UPDATE!
COLLARS NOW UP ON ETSY FOR SALE!
$11 per collar with $2 shipping
COLLARS NOW UP ON ETSY FOR SALE!
$11 per collar with $2 shipping
follow me on facebook, send me a message and receive 10% off
link for facebook is on the updated etsy collar post that was placed November 22nd.
I'm easy to search for just look for FANTASMLUA
^__^ THANK YOU!
^__^ THANK YOU!
Monday, November 12, 2012
Free Portal Amigurumi Pattern: Wheatley
Hi Everyone!
Today I made a Wheatley Amigurumi. He's not the greatest one out there but he's made completely out of yarn. No hard bits. Yes I am proud of that because one it's cuddly and two if a kid wants one it's safe for them ^^

He's approximately 4-5 inches in height...I couldn't find my tape measure to make sure. He fits nicely in your hand. I hope you get a chance to make him. Now this is free. I just ask that when you use it you give me some credit since I did make this pattern. Please don't sell him for profit. I repeat COPYRIGHT.
With that said here you go:
Portal Wheatley Amigurumi:
You will need:
Yarn:
white
blue
black
light grey
dark grey
I used Red Heart yarn
Hook: F/5-3.75mm
Darning/tapestry needle (what ever the yarn can fit through)
Poly-fil
Using the white yarn
Chain 3 and join.
You can also use the magic ring method. I tried both before finishing the product. My preference was the traditional chain 3, looked a little bit neater. I suggest you try out both methods to see what you like best : )
Abbreviations:
SC = Single Crochet
ST= Stitch
SL ST = Slip Stitch
SC DEC: Single Crochet Decrease
FO = Fasten Off
R1: Work 9 SC in the ring, you may SL ST to keep it a little neater looking at the end.
Switch to the blue yarn.
R2: Work 2 SC in each ST (18 ST at the end)
R3: SC all around.
R4: 1 SC in next 2 ST then 2 SC in the 3rd ST, repeat til the end.
R5: 1 SC in the next 3 ST then 2 SC in the 4th ST, repeat til the end.
Switch to the black yarn.
R6: 1 SC in the next 4 ST then 2 SC in the 5th ST, repeat til the end.
Switch to light grey yarn.
R7 - 12: SC all around.
R13: 1 SC in the next 4 ST then do a SC DEC (30 ST at the end).
Turn work inside out, because the inside is actually the outside part that will be seen.
R14: 1 SC in the next 3 ST then do a SC DEC (24 ST at the end).
Stuff with Poly-fil
R15: 1 SC in the next 2 ST then do a SC DEC (18 ST at the end).
R16: SC all around.
R17: SL ST skip a stitch and SL ST again, repeat (approximately 9 SL ST needed, but may need more or less depending on how loose or tight your stitches are).
Make a knot or two and sew the excess thread into the ball.
For the sides:
Make 2
Using the dark grey yarn:
Chain 3 and join with SL ST
R1: Work 9 SC in the ring, you may S ST to keep it neater.
R2: 2SC in each ST.
Switch to light grey yarn.
R3: SC all around.
FO and sew onto the side of the ball.
Handles:
Make 2
Using the dark grey yarn:
Chain 20.
R1: Using the back of the crochet or also known as the "butts" of the chain, SC all 20 ST
R2: 1 SC onto the other side of the chain to make it look more bar like. JUST ONE SC we are not going down the 20 ST again on the other side. This is just 1 SC on the first stitch on the other side. FO.
Leave enough yarn to sew to the ball. I basically just sewed the one side then passed the needle through the ball to the spot I was going to sew the other side of the handle to and sewed it like that then just tucked the yarn into the work and snipped off the excess when I brought the needle back out.
And there you have a Wheatley all to yourself!
I hope my pattern made sense.
If you have any questions don't hesitate to ask : )
Enjoy!
Next pattern I plan to do is for the Space Core but sort of a Nyan Cat space core scarf.
That pattern will be made available on etsy. As well as the original product if anyone wishes to buy it. Prices have yet to be determined. They won't be expensive.
Thursday, November 1, 2012
Hakuouki Craft
Hi Everyone!
So yesterday was Halloween my trick or treat night got scheduled to Saturday night because of the hurricane. So while I entertained myself with TCM's lovely night of old time horror ^.^ Boris Karloff was on. I decided to work on my best friend's Christmas present. Well I thought it would take a long time and it actually got finished last night....because I didn't pay attention to the time and when I started at 9 pm and was watching movies I did not see time go by to 5 am ya I was that into my work and my movies....
Well I designed for my friend a Ibuki Ryonosuke pillowcase. I embroidered it myself. I don't think it's the greatest work but since his products are rather limited I had no choice but to make something...sorry eBay I'm not paying $90 for a plushie that cost the company $5 to make --;
So here's my attempt. I did the outline in graphite paper outlines and then redid it with fabric marker. Then embroidered away into the night!
 The picture I used
 The outline....the dogs tried to share in the project....I found some puppy fuzz....on it after I walked away to get a drink....
The finished project
The outline....the dogs tried to share in the project....I found some puppy fuzz....on it after I walked away to get a drink....
The finished project
 And comparison of project and photo
Let me know what you think and if you have any ideas ^^
So yesterday was Halloween my trick or treat night got scheduled to Saturday night because of the hurricane. So while I entertained myself with TCM's lovely night of old time horror ^.^ Boris Karloff was on. I decided to work on my best friend's Christmas present. Well I thought it would take a long time and it actually got finished last night....because I didn't pay attention to the time and when I started at 9 pm and was watching movies I did not see time go by to 5 am ya I was that into my work and my movies....
Well I designed for my friend a Ibuki Ryonosuke pillowcase. I embroidered it myself. I don't think it's the greatest work but since his products are rather limited I had no choice but to make something...sorry eBay I'm not paying $90 for a plushie that cost the company $5 to make --;
So here's my attempt. I did the outline in graphite paper outlines and then redid it with fabric marker. Then embroidered away into the night!
 The picture I used
 The outline....the dogs tried to share in the project....I found some puppy fuzz....on it after I walked away to get a drink....
 And comparison of project and photo
I think this looked better as an outline and some day I hope to try and fabric paint it but for embroidery...and me not being very good at it I think this was a project well done and I hope she'll like it when she gets it at Christmas ^^
Let me know what you think and if you have any ideas ^^
Sunday, October 28, 2012
Foamy the Squirrel Amigurumi Update
Hi Everyone!
I know last year I promised a Foamy the Squirrel Amigurumi but so far....major fail I've hated my design every time. BUT the other day I was trying to do the Vampire Bat Kitten that's in one of the comics of JIMathers, it's one of the cartoon commercials. And I kept trying to form the head properly and I had it in brown yarn...lets just say a different character seemed to decide he wanted made first. So everyone in a week or so you will have a picture of a completed Hata. His head is done so are his eyes. I'm currently working on his hat and his body. So I'm hoping this goes well.
Pictures soon!
 This is his newer version this picture came directly off of illwillpress.com and is under characters.
I'm hoping I do him justice.currently trying to figure out the tail and how to do the comb out of clay.
I know last year I promised a Foamy the Squirrel Amigurumi but so far....major fail I've hated my design every time. BUT the other day I was trying to do the Vampire Bat Kitten that's in one of the comics of JIMathers, it's one of the cartoon commercials. And I kept trying to form the head properly and I had it in brown yarn...lets just say a different character seemed to decide he wanted made first. So everyone in a week or so you will have a picture of a completed Hata. His head is done so are his eyes. I'm currently working on his hat and his body. So I'm hoping this goes well.
Pictures soon!
I'm hoping I do him justice.currently trying to figure out the tail and how to do the comb out of clay.
Sausage Casserole
Hi Everyone : )
Today I got a rather tastey recipe for you.
The only sad part is I don't have a picture for it because my camera wasn't being very cooperative.
This dish goes wonderfully with white rice.
You'll need:
1lb mild ground sausage
2 cups frozen mixed veggies, I used a mix of peas and carrots
1 onion diced
1 tsp of minced garlic
1/2 tsp rubbed sage
2 boxes of stuffing
1 can of condensed cream of mushroom soup
1 can of condensed cream of celery soup
1/2 cup of sour cream
olive oil
Preheat your oven to 350 degrees.
Saute your onion and garlic with about a table spoon of oil. Then add your ground sausage and break it apart so ti's nice and piecey. Now in a casserole dish put the mixed veggies in, you don't need to cook them put them in frozen.
Then mix in a bowl the condensed soups and sour cream mix well and set aside.
Once the sausage is cooked add the sage. Drain the sausage of it's fat and layer the meat over the frozen vegetables. Then layer the soup mixture on top of it.
Then follow the instructions to make your stuffing once it's cooked layer it on top of everything on the casserole. Cover it with foil and bake for 1 hour covered. Then once that is over uncover it and bake for half an hour or until the stuffing is a pretty golden brown.
Now serve it with white rice.
This is really tastey I had to keep myself from having seconds ^^;
Hope you give it a try!
Saturday, September 1, 2012
DiscWorld Death Plushie
Hi Everyone!
So I did a quick project for fun. It took me about 2 days to do.
One of my favorite authors is Terry Pratchett who writes the DiscWorld novels.
And one of my favorite characters is Death. He's adorably cute...ya kinda weird to say that about Death but it's true he's cute. His home is in shades of blacks, greys and whites with additions added to it like it was drawn by a five year old. Plus he just loves curry and owns a horse named Binky and is known to use a motorcycle on occasion.
I love him : )
And I love the death of rats who will be my next project for DiscWorld.

How could you not love that????
Now I have a great pattern book for amigurumi and this is where I got the idea for Death. Creepy Cute Crochet by Christen Haden.
But that just makes a basic death.

I loved the pattern look and the idea but I did not like the pattern lay out itself. Um I know that makes no sense ^^; So let me try to explain myself.
The patterns provided for the basic bodies of the amigurumi are given in English written format or in international graph format. As seen in the picture below:

Now the rows of the plush where you single crochet through out I was alright with. The decreases I quite liked because it gave some nice shape to the body. The increases that made the body larger I did not quite agree with. With my amigurumi I like mine to increase something like this.
Make the magic ring do two single crochets in each stitch. Then the next row would be do one single crochet then in the next stitch do 2 single crochet. And then each row the single crochet before the 2 single crochet in one stitch would increase by one.
Example:
R1: 2 sc in each stitch
R2: 1 sc in stitch then 2 sc in next stitch, repeat
R3: do 2 sc one in each stitch then 2 sc in the next stitch
Tends to make it a bit more even.
This pattern on the other hand required a chain one when you started each row which I didn't like the shape it formed too much plus if you crochet loosely it can leave a rather big gap (note amigurumi is one of the only times you should crochet tightly). So I altered it to fit my way of increasing.
Now other than that the body and head patterns were the same. The hood pattern I used exactly as was instructed.
She then tells you to use sculpey to make his eyes and scythe.
Now I'm not a fan of sculpey eyes.
So I used the stuffed animal eyes you can get at the craft store with the safety backs to hold them into place.
If you notice DiscWorld Death has blue flames in his eye sockets. That's not something they put on toy eyes. So I painted them myself with FolkArt Acrylic Paint, I used the type called Shiny and just mixed the colors up.
I painted the flames in and then I wanted him to have shiny eyes because that just makes a chibi look cuter. So I used FolkArts Clearcote Hi-Shine Glaze.
I would like to warn you that spraying this stuff on toy eyes can actually melt them just a tiny bit around the edges. So I had to keep turning them after I sprayed them to make sure it didn't end up too funky looking. After it was coated I lightly sanded around the edges to get rid of some of the roughness.
I put them into the head before I stuffed it. Then for safety sprayed some more glaze onto a soft brush and brushed more on. I let it dry over night.
After everything was done I pieced it together. I stuffed the head with poly-fil I did the same for the body but also used poly pellets to weigh him down. After that all I needed was his scythe which I made out of sculpey. The colors were black and silver. Baked it for 25 minutes. Let it cool then I used embroidery floss to sew it on to my plushie.
And here is my end result. Please ignore my clock and my bottles full of pellets.
By the way though if you need a container for pellets an empty snapple bottle works great : ) Also great when you need to pour it out.

I love my chibi Death he's cute I just need to make him a companion now
I'm also going to try to make his horse, Binky.
Hope you like him : )
And please try out Creepy Cute Crochet It's a great amigurumi book
Because let's face it those of us who like our amigurumi creepy, morbid and cute at the same time got to have this book. For heaven's sake Cthulhu is cute even!
So I did a quick project for fun. It took me about 2 days to do.
One of my favorite authors is Terry Pratchett who writes the DiscWorld novels.
And one of my favorite characters is Death. He's adorably cute...ya kinda weird to say that about Death but it's true he's cute. His home is in shades of blacks, greys and whites with additions added to it like it was drawn by a five year old. Plus he just loves curry and owns a horse named Binky and is known to use a motorcycle on occasion.
I love him : )
And I love the death of rats who will be my next project for DiscWorld.

How could you not love that????
Now I have a great pattern book for amigurumi and this is where I got the idea for Death. Creepy Cute Crochet by Christen Haden.
But that just makes a basic death.

I loved the pattern look and the idea but I did not like the pattern lay out itself. Um I know that makes no sense ^^; So let me try to explain myself.
The patterns provided for the basic bodies of the amigurumi are given in English written format or in international graph format. As seen in the picture below:

Now the rows of the plush where you single crochet through out I was alright with. The decreases I quite liked because it gave some nice shape to the body. The increases that made the body larger I did not quite agree with. With my amigurumi I like mine to increase something like this.
Make the magic ring do two single crochets in each stitch. Then the next row would be do one single crochet then in the next stitch do 2 single crochet. And then each row the single crochet before the 2 single crochet in one stitch would increase by one.
Example:
R1: 2 sc in each stitch
R2: 1 sc in stitch then 2 sc in next stitch, repeat
R3: do 2 sc one in each stitch then 2 sc in the next stitch
Tends to make it a bit more even.
This pattern on the other hand required a chain one when you started each row which I didn't like the shape it formed too much plus if you crochet loosely it can leave a rather big gap (note amigurumi is one of the only times you should crochet tightly). So I altered it to fit my way of increasing.
Now other than that the body and head patterns were the same. The hood pattern I used exactly as was instructed.
She then tells you to use sculpey to make his eyes and scythe.
Now I'm not a fan of sculpey eyes.
So I used the stuffed animal eyes you can get at the craft store with the safety backs to hold them into place.
If you notice DiscWorld Death has blue flames in his eye sockets. That's not something they put on toy eyes. So I painted them myself with FolkArt Acrylic Paint, I used the type called Shiny and just mixed the colors up.
I painted the flames in and then I wanted him to have shiny eyes because that just makes a chibi look cuter. So I used FolkArts Clearcote Hi-Shine Glaze.
I would like to warn you that spraying this stuff on toy eyes can actually melt them just a tiny bit around the edges. So I had to keep turning them after I sprayed them to make sure it didn't end up too funky looking. After it was coated I lightly sanded around the edges to get rid of some of the roughness.
I put them into the head before I stuffed it. Then for safety sprayed some more glaze onto a soft brush and brushed more on. I let it dry over night.
After everything was done I pieced it together. I stuffed the head with poly-fil I did the same for the body but also used poly pellets to weigh him down. After that all I needed was his scythe which I made out of sculpey. The colors were black and silver. Baked it for 25 minutes. Let it cool then I used embroidery floss to sew it on to my plushie.
And here is my end result. Please ignore my clock and my bottles full of pellets.
By the way though if you need a container for pellets an empty snapple bottle works great : ) Also great when you need to pour it out.

I'm also going to try to make his horse, Binky.
Hope you like him : )
And please try out Creepy Cute Crochet It's a great amigurumi book
Because let's face it those of us who like our amigurumi creepy, morbid and cute at the same time got to have this book. For heaven's sake Cthulhu is cute even!
Thursday, August 23, 2012
Aperture Kitchen: Chicken Stew with Biscuit
Hi!
Because Aperture has to feed those test subjects sometimes!


Because Aperture has to feed those test subjects sometimes!


Ingredients:
1 LB chicken
1 pkg mixed vegetables
2-3 chicken boullion cubes
1 tbs white wine
1/2 tsp minced garlic
1/2 tsp worchestershire sauce
pepper and salt to taste
3 cups water
2tbs unsalted butter
2 tbs olive oil
1 small onion diced
1/2 tsp rubbed sage
3 tbs flour

"A" is for APERTURE
Over medium heat add the oil and butter. Melt the butter and saute the onion and garlic.
Add the chicken and brown, make sure it cooks all the way through.
Add the boullion and sage.
Add the vegetables and flour. Mix well.
Then add the rest of the ingredients.
Stir occasionally and bring to a boil.
Then simmer for about 30 minutes.
Then done! Serve Enjoy!
For the Biscuits:
Preheat to 450 degrees
Ingredients:
2 C flour
1 tbs bakingpowder
2 tsp sugar
1/2 tsp cream of tartar
1/4 tsp salt
1/4 tsp baking soda
1/2 C shorteinging
2/3 C milk or buttermilk
Mix dry ingredients together. Then add the shortening and mix well. Mix to the point it looks like coarse crumbs. Then add your milk. Mix til it combines. Then on a lightly floured surface knead the dough lightly. Then pat it down until it's 1/4 inched thick and cut them out. I used a cup.
Then on a baking sheet that's been sprayed with nonstick spray bake them for 10 minutes or until lightly golden brown : ) yummy
Next recipe for Aperture kitchen contains potatoes because Glados hates them
Bird and Potato carnage for all!
Hope you enjoy : )
Aperture Kitchen
Hi Everyone!
My friend introduced me to Portal and well....I became addicted.
Plus to make it even more entertaining my friend likes the fact that I share the same name with Glados. Yes that's right people I'm a Caroline. Exact spelling and pronunciation. Maybe...that means I shouldn't play with science or computers....
So I got to thinking what if Glados was like me and liked to cook when she was a human?
I mean cooking is sort of like edible chemistry. That and in Portal she has a cake recipe on some of the computers.
So what do you get when you mix nerdery with cooking?
That's right
Glados's Kitchen
APERTURE KITCHEN
Because lets face it they had to feed their test subjects....occasionally...right?
First one coming up is Chicken stew with biscuit
Because Glados I would like to think after Portal 2 has a new found hatred for birds and potatoes
Youtube video coming soon!
Because everything is better with pictures : )
TV Blanket Completed
Hi Everyone!
As promised here's the finished product from the stitch n' bitch crochet book
I gave it to my friend for her birthday
Sasha was sad to see it go


As promised here's the finished product from the stitch n' bitch crochet book
I gave it to my friend for her birthday
Sasha was sad to see it go
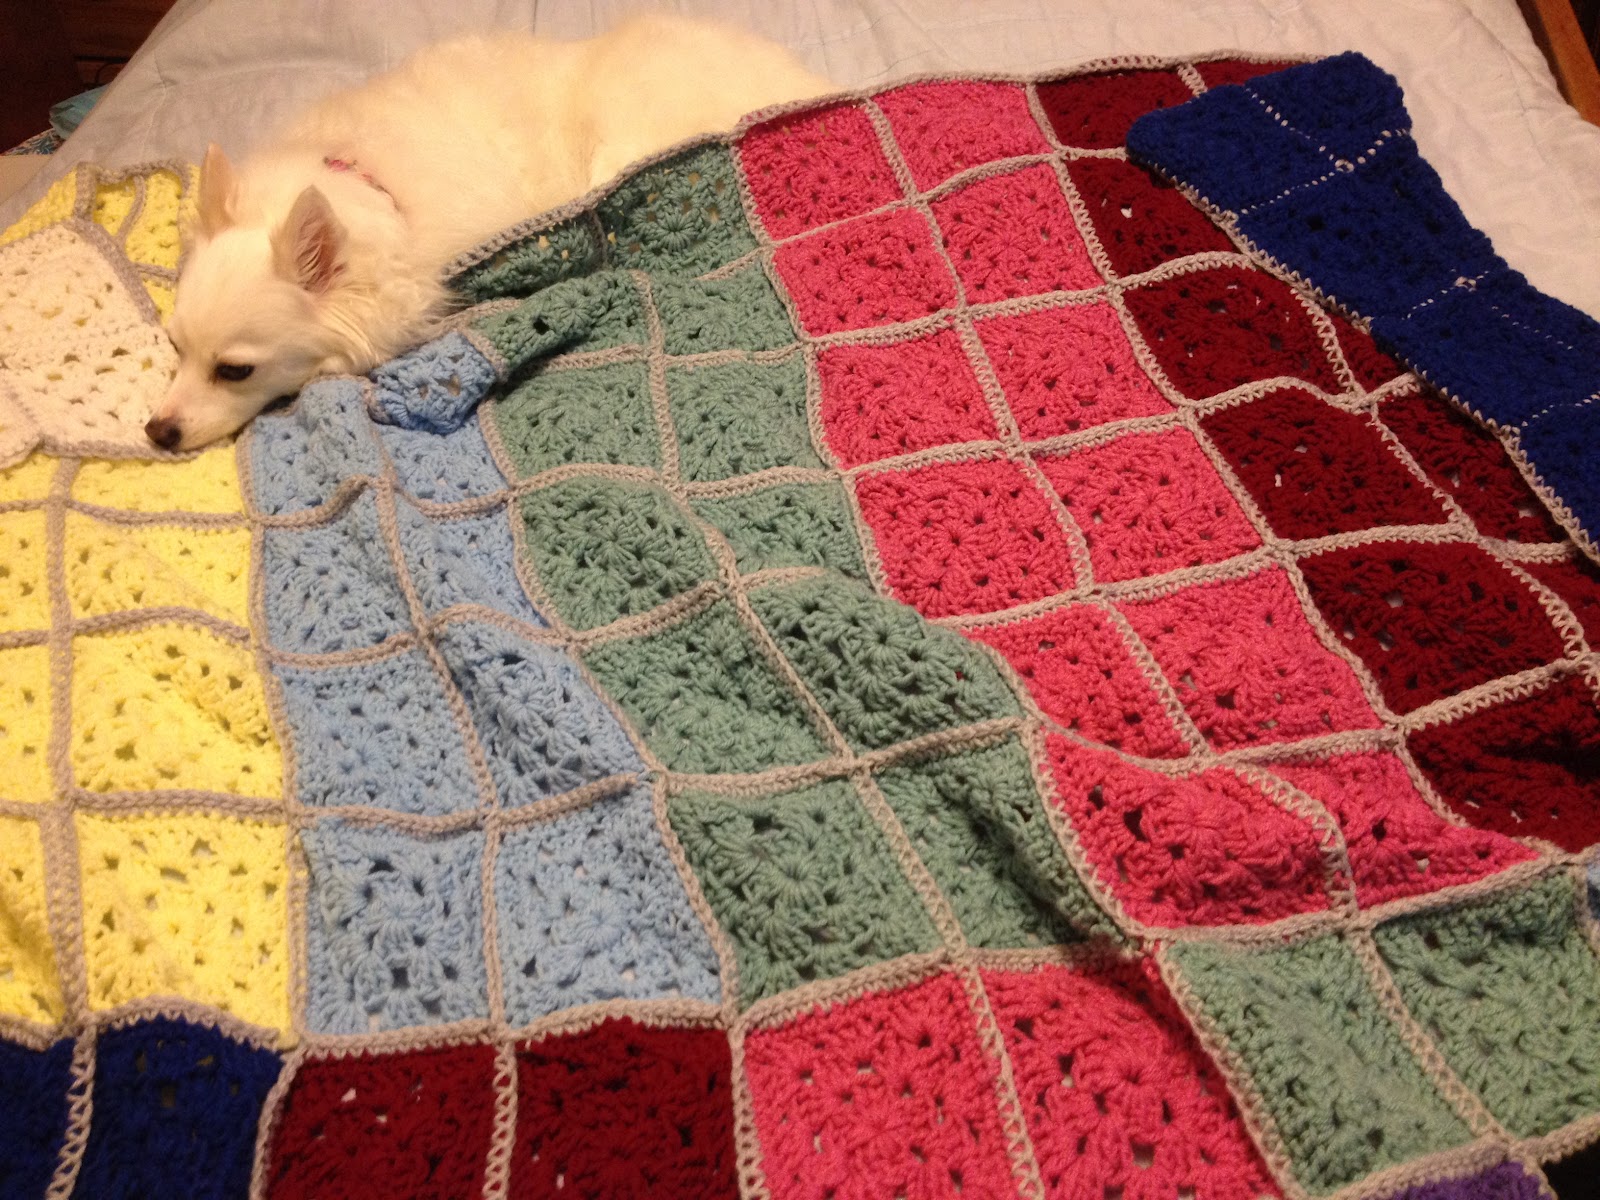

Left side is what the front looks like and to the right is the back
This blanket was pretty huge and almost fit a full sized bed
It was done in RedHeart brand yarn
All in all this was a fun pattern
To connect the squares I did not sew them together they're held together with grey yarn in single crochet : )
Tuesday, August 7, 2012
BEWARE! Pet Shopper Scams!
Hi Everyone!
This is a topic of extreme importance!
I want to protect everyone from being scammed no matter what the subject.
But today’s subject is pet scams.
You know you want to get a little puppy for the family or maybe a kitty.
And there's people out there waiting to scam you of your money. They don't care about you and they don't care that you lose your money.
You'd think people this smart would go out and get a real job but no.
Now here's the scoop I was almost scammed recently and I prevented it.
I'm currently unemployed I lost my job at the bank due to reasons I could not control.
I can't waste my money away I'm on unemployment. That mostly goes off to pay the bills I racked up while being employed and to paying off my school bills.
I had some small amount of money on the side I was hoping to get my two dogs a little sister.
A few hundred that's good to look through the paper and online I thought.
So I looked I found a dog site where you post your animals.
The site said the seller was from Greensburg PA not very far from where I live, not a very long drive.
So I thought what the heck I'll give it a shot.
Here's where it got iffy.
I emailed the person yesterday literally Monday night at about 12:30 am aka it's already today (Tuesday) I get an email from them around 3am asking me questions on why I'd like to have the dog and they were looking for a good home and just needed me to pay adoption and shipping fees. I answer thinking maybe they're an extreme night owl like me, trying to be optimistic.
She said her and her husband just got transfered because they worked for the aidsfoundation. And since they were so busy they couldn't give her two puppies the attention they truly deserved. Plus she sent photos of them.
RED FLAG. But I tried to think positive I didn't want to be negative right off that bat.
Well I get another email at an ungodly hour. So I start to think "...this is iffy"
I get informed they had just moved to Kent, Washington.
The woman was highly insistent on shipping her puppy that day due to it being her supposed day off.
She told me she had inquired on shipping prices earlier on how much it would take to ship a dog through the US and it was $240 or $250 if I wanted the dog delivered to my house. And that the airport was 40 minutes from her house.
I had already given her my name, my home address, my cell number, and she had my email address
Well that just sent alarms in my head.
LESSON NUMBER ONE!
Play connect the dots!
If the ad says it' in Greensburg
Then they say they're now in Kent when the ad was posted about one month ago from Greensburg
AND the dog will ship almost one hour away supposedly from another location
THIS IS JUST A BIG NO NO! DOES NOT COMPUTE! DOES NOT MATCH BACK OFF NOW!
Out of curiosity I look up the place they were to ship the dog from a US Shipping Line
This company is NON EXISTANT
The woman literally waited about an hour then kept contacting me saying she registered the puppy and the company was NOT calling me but emailing me confirmation and telling me how to pay for the shipping fees.
Might I add this woman would not call my phone to speak to me she kept using mobile yahoo messenger
Also when I asked for a phone number to contact her with the number she gave the area code was (330)
330 is the area code for AKRON OHIO
How did I know this? I know this because my best friend when I met her was from Akron Ohio and that's the area code for her cell phone.
I tried to make polite conversation and said "oh I see you used to live in Akron Ohio, my friend is from there and that's her area code, it's nice there isn't it" well that set the woman off and she told me I was upsetting her and kept asking me what this was about and why I didn't trust her.
I merely said I was just trying to make small talk.
After a while I get the email from the shipping line company.
The title comes from a NATION WIDE PET DEPARTMENT
The email looked very fake. Pictures were not clear at all it looked like they were copied and pasted and made to look larger. The pictures in general were fuzzy which if you are a real certified company you would not have your emails or sites look like that at all. And they requested prompt payment from your debit/credit card or only money order.
If it was a reputable shipping company they would give you far more options. Such as billing you.
Also before I received the email from this supposed company I called the two airports near me and asked them if they dealt with this company I was told they never heard of it. Another red flag people!
I called Pittsburgh International Airport and the woman I spoke with informed me that the animal that would be shipped would only come from an airline. Not some shipping company. Once again another red flag.
I clicked on the website provided. It was a locked domain. And it stated it was a personal website. Not a business or a corporate, it was personal. So within that time the woman from my opinion had set up this domain in the hour she waited to contact me again. Plus I had my best friend call the number provided, it was a nonfunctioning unlisted number.
I told the woman the email did not work and the site did not work.
My last message from her was "How can you say that???"
I apologized saying I could not take the dog apologized for wasting her time and her day off and said I hoped she would find a good home for the puppy
I'm so glad I got away safely with my money still in my pockets.
I just have to hope they don't do anything with my name, home address, cell number or email.
But then again if someone wants your information darn it there's just nothing that will stop them.
I'll have to keep checking my files to make sure nothing was touched.
The sites given were
USPSHIP.COM
Nationwide Pet Department
Nationwide Pets delivery @gmail.com
From personal experience I have NOT seen a company have a Gmail account so once again this shows how fake this transaction is.
Please everyone connect the dots when purchasing online.
Even when doing online job submittals like I am.
Think of it this way
IF IT SOUNDS TOO GOOD TO BE TRUE IT IS!
It means back away it's faker than a woman's breast implants!....pardon my comparison....I'm just rather angry I got that far in being scammed.
I want to warn you
Please purchase your pets at reputable shelter you can physically walk into or at a pet store you can physically walk into.
Do not deal with pet sellers online learn from my experience
Also this goes for jobs if they tell you you'll work from home.
That they'll send you a pay in advance and they want you to send some back or something like that.
It's fake it's too good to be true and in the end you're out a lot of money
Because one the transfer is fraudulent and the bank will take it out, the money you send back in transfer is instantly gone and you can NEVER get it back, and whatever you spend out of that fake money you will owe back to the bank because it was money that you never had in the first place.
I saw this too many times at the bank.
Please protect yourselves.
I'm just so happy I didn't send them anything.
Please listen to my warning
Thank you for your time.
And thank you for listening to my warning slash rant.
Please protect yourselves
....I know I'm a broken record.
Monday, July 16, 2012
Receita de Bolo Prestigio/Recipe for Prestigio Cake (Mounds Cake)
Hi Everyone!
Come summer time I become a baking fool! It just seems every month is someone's birthday. June for my mom, July for me, August for my dad.
For my mom's birthday I made Bolo Prestigio.
Now Prestigio is a candy bar from Brasil.

The best way to describe it is that it's like a Mounds bar….but far better. It's milk chocolate with a creamy and flakey coconut filled center. I apologize to America but when it comes time for this poor Halfling of an American Brasilian to choose between which country has the best food I will always say Brasil, and they just beat us at chocolate.Just seeing a picture of it makes my mouth water
If only ordering from the Brasilian stores in the USA didn't cost an arm and a leg to ship things -___-;
Now you might be wondering how you get a cake to taste like prestigio or a mounds bar. Simple.
You search the net for the recipe and take an eternity to decide which one is the best one.
I'm not dissing my fellow bakers out there, your pictures and descriptions were marvelous. I just couldn't help going with the one recipe I knew to be fool proof.
NESTLE!
Nestle has their own site on the web dedicated to their Brasilian recipes. And when I found the recipe for this cake there I was ecstatic.
Here's what mine looked like. Granted there are probably far prettier ways to decorate it.

It's topped with coconut flakes and 2 mounds bars.
Here's the inside of the cake, tempting isn't it
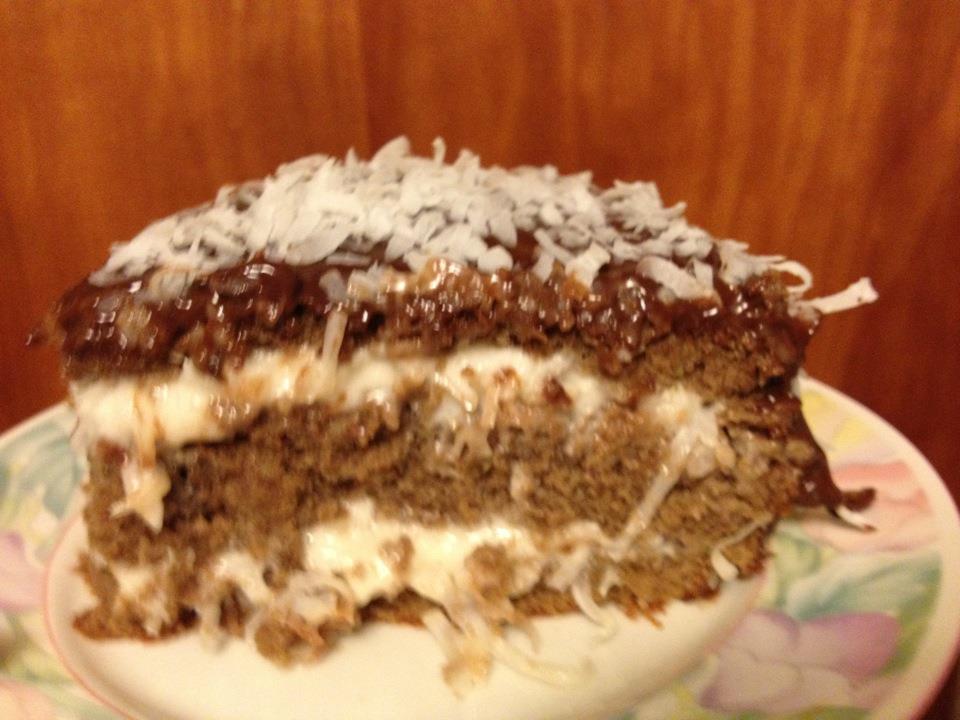
I loved every bite of this cake.
Now before the recipe a small lesson on Brasilian cakes.
From my understanding of these beautiful delicacies is that they're not at all like the kind we find in America.
America we have them super soft and moist and topped with a thick layer of butter cream icing. Tasty yes but I've really never seen one during my visits to Brasil.
Brasil tends to take a more French look to their cakes. Some are a bit more dense while some are still airy and light. It's just a different experience and you just got to try it out.
Now I'm translating this as best as I can from its Portuguese original. I made a few changes to how it's prepared which I say improves the texture of the cake.
The cake as you can see has multiple layers. The cream, the cake and the topping.
Original link: http://www.nestle.com.br/site/cozinha/receitas/Bolo_Prestigio_de_Festa.aspx
Ingredients:
Batter/Massa:
- meia xícara (chá) de manteiga ½ cup of unsalted butter at room temperature
- 1 xícara e meia (chá) de açúcar 1 ½ cups of sugar
- 6 ovos 6 eggs at room temperature
- meia xícara (chá) de leite ½ cup of milk
- 1 xícara e meia (chá) de farinha de trigo 1 cup of flour
- 1 xícara (chá) de Chocolate em Pó DOIS FRADES® 1 cup of chocolate powder (brand of your choice) or 7-9 oz of good semi sweet baking chocolate (I used lindt)
- meia colher (sopa) de fermento químico em pó ½ tbs of baking powder
- manteiga para untar butter to spread on your baking pan
- farinha de trigo para polvilhar flour to dust and coat your baking pan
- 3 claras 3 egg whites
- meia xícara (chá) de açúcar ½ cup sugar
- 1 lata de Creme de Leite NESTLÉ® 1 can of creme de leite Nestle (this can be found in the hispanic section of your grocery store, also titled Media Crema)
- 2 xícaras (chá) de coco em flocos seco 2 cups coconut flakes
Cover/Cobertura
- 1 lata de Creme de Leite NESTLÉ® 1 can creme de leite nestle
- 1 tablete de NESTLÉ CLASSIC® Meio Amargo picado 1 bittersweet baking bar or even better the kind you buy to eat by itself : ) I'm a major fan of lindt
- meia xícara (chá) de leite ½ cup of milk
- 2 colheres (sopa) de leite de coco 2 tbs of coconut milk
- coco ralado para decorar coconut flakes to decorate
- raspas de chocolate para decorar grated chocolate to decorate (optional) can also use a mounds or prestigio bar to put in the center of it
Preheat your oven to 350 degrees Ferenheit
In a large mixing bowl mix your butter and sugar until combined and creamy. Seperate your egg yolks and whites. Add the yolks to the butter mixture and mix them in until blended. Do this one yolk at a time.
Slowly mix in the flour and your chocolate. If your using the powdered chocoalte feel free to mix it in with the flour. If using a chocolate bar please melt it gently in a double boiler (aka the two pots you use at once, the bottom filled with hot water and the top pot ontop of that one melting your chocoalte).
Mix in your milk and baking powder.
At this time take a mixer and beat your eggwhites into stiff peaks. Once that is done gently fold them into the batter.
Using a round baking pan (a large one, not one of those small 8 inch ones where you have to use two). Butter and lightly flour the pan. Add your batter.
Gently drop it onto your table and spin it do this about two times. It will help get the bubbles out of it.
Bake this for about 30 minutes or until a toothpick comes out clean.
After that's done let it cool completely.
Now work on your cream:
Once again using your double boiler or a the lowest flame setting on your stove in a pot, mix the egg whites and the sugar over a very low heat for about 3 minutes. DO NOT let it boil or simmer. This is just quickly tempering the egg and help it get the consistency you want. After the three minutes are up quickly transwer it to a mixing bowl. Using a mixer turn the eggs into stiff peaks. Then gently mix in the creme de leite and the coconut flakes.
Cover it with plastic wrap and refridgerate until you're going to use it.
Covering:
This is honestly the easiest part of the cake! It's pretty much a simple ganache. In your double boiler gently melt your chocolate bar. Remove from the heat and mix in the creme de leite. Blend completely and leave to cool.
Putting the cake together:
Carefully cut your cake into three sections.
Place the bottom part down and gently spread the cream onto it. Then put on the second layer. This is where you use the milk and coconut milk. Gently mix those together. With a toothpick poke little holes into the second layer of cake. Then gently drizzle some of the milk and coconut milk mixture onto the cake layer. Then cover with cream. Put on the final cake layer and cover with the ganache. Decorate with coconut/chocolate flakes. Some people just cover it with chocoalte sprinkles like a brigadeiro cake (recipe coming soon!).
Let the cake chill until you plan to serve it. I say chill it just because I think it makes the flavors better but trust me you don't have to wait to eat it ^_^
I hope you give this recipe a try.
Please let me know what you think of it or even send me pictures of your own bolo prestigios
Have a great week everyone!
Saturday, July 14, 2012
Heat Wave: Ideas for Kids and Pets
Hi everyone
In this month of July I just want to remind everyone to stay cool.
It's painfully hot out watch out for your pets it's sad to see on the news animals dying because their owners neglected them in the hot sun without water. Remember if you can keep them inside and always make sure they have water and an area in the shade to rest in. I mean seriously how would you feel if someone tied or locked you up in this heat without water? It wouldn't be fun!
Ideas for your pet pals:
Keep them in the shade
Check them at least once every hour to see how they’re doing.
Give them water, make it even better put some ice in it. You enjoy it so do they.
Also this may sound silly but it makes my dogs so happy. Give them a bath. A nice cooling bath makes them so happy.
Also
Ideas for your little ones:
If you can keep your younger kids inside do so please
Lots of hydration and no I don't mean juice or sodas. Water is the best drink of choice.
I'm personally not a fan of giving kids things like Gatorade...empty calories, bad for their teeth
If your kid does sports there are waters that contain electrolytes just like Gatorade and it won’t' leave your kid thirsty (Any sugary drink never truly quenches your thirst, water is the best thing) One I like very much is Smart Water No calories, just good water with electrolytes : )
If you have a pool or can get access to one, go to it and enjoy it. Water activities are more appropriate for the types of temperatures we've been having. We don't need anyone keeling over.
Sun block! Children need it and they'll thank you in the future. You're not just protecting them from skin issues like cancer but also from premature aging. Let’s face it your little girls when they're my age will be happy you did this! I know I'm thankful to my mom.
Keep them cool give them an icy treat:
Ice-cream is nice and so are popsicles
This is where you can give them their juice fix!
Actually any drink can be done like this
So apple juice, grape juice, iced tea, lemonade
All can be made into homemade popsicles plus it's easy to make and you know what you'll be giving your kids, no funky neon food coloring there!
I hope you use some of my ideas and let your little ones and your pets have a fun and safe summer : )
Craft Treasures at Auctions
Hi Everyone!
I just wanted to share with you something that I personally love to do. I love going to auctions. Someone else's stuff can become your new found treasure ^.^ Examples I replaced my family's dishes from auction purchases. About two weeks ago I went to an auction and the prices were fantastic. I literally got 4 boxes of dishes each box being a buck a piece. I basically ended up with two brand new sets. One being a brand called GibsonUSA and a set of plain white Corelle dishes. It was wonderful.
Depending on the style of dishware or cooking utensils and on how your auctioneer handles his work, you could be walking off with some great stuff and all dirt cheap. The only ones I see going for insane prices are cast iron skillets and pots depending on their condition but still worth trying to buy. Also different sets of cookware that are much older like the 40's and 50's and earlier where they were really well crafted pieces.
Example I bought an electric waffle maker for $3 at the same auction I got my dishes, now I used to have a brand new one from Wal-Mart but it was terrible the pieces didn't come out for you to clean them so I was stuck making pathetic attempts at cleaning an electrical appliance then being terrified to plug it in the next time.
The model I got at the auction is older, made out of full metal and only rubbery/plastic handles. It also has one of those neat old time cords. BUT the best part of it is that the iron is detachable by screw. Meaning I can actually wash it and not worry about getting the entire machine wet. Yay for not having to fear electrocution as much!
Now a fun and exciting tip for my fellow crafters!
Did you know you can get craft supplies at an auction???
When I realized this it was the best day ever.
Some auctions are from older couples who are either moving away, moving into a home, or sadly they have passed away. While this can be very sad you can personally make sure their love of crafting goes on. Let them see your excitement over their collection of old buttons and fabric. It might spark some conversation on some of their old projects, share ideas. A crafter is always a crafter! When I'm old decrepit and incapable of doing crafts I hope to God there will be someone young willing to ask me about my old projects and ask me about techniques. It at least lets you enjoy what you used to do and love through conversation.
Depending on what it is your craft supplies can go at dirt cheap prices at an auction.
Collectible items or magazines can be pricey especially if there is another fellow crafter going after the same thing. I've had my dad bid for me just because he's better at it so I didn't completely lose without a fight.
Today (July 14, 2012) I went to another auction and hit the mother load. And I took some pictures to share with you all ^.^
But first here's the story of my auction today.
I got there bright and early at 8am to just see everything up for auction. Now I had my eyes on this little sewing thread holder. It's made out of wood, the top has a pin cushion attached, and it came with wooden spools....and we all know you don't really see those anymore for sale in stores. But while looking around I decided to visit the attic, the attic had EVERYTHING from books to dressers etc. But in the very corner there was some sewing and quilting supplies. It looked like a small stash and I thought it'd be fun to try and get it.
Well by the time that lot came up it was between me and another lady. The starting bid was $3 and we battled until I won at $20. Now thinking it's such a small stash I could just whisk it away no problem....now here's where the fun began. I get informed by the auctioneer I did not just bid on this small stash but the ENTIRE corner of the attic which is supposedly all sewing supplies. So I go look.
It's covered in junk. Papers and plastic bags everywhere. I did out old foam padding for cushions, so old it was unusable. I did find some nice strips of quilting pieces to play with. I've always had an urge to make a quilt and thought it'd be something fun to practice with. So I set that aside....then diving deeper into the giant pile I find more remnants of quilt pieces....which they should have pitched. I was fine I kept diving. Out of a massive pile of what I can personally call crafters leftover and unusable trash I found some good pieces.
Two bolts of old upholstery fabric. I have 2 dogs so they are so getting new pillows out of that if the fabric holds up. Good value there. Plus all the quilt pieces I could use, bags upon bags of those in blues, yellows and reds, old knitting magazines, a crochet hook NEVER out of the packaging, and crafts from what I can see being the 60's. The titles on the bags are "Gift Craft Unlimited" which is from National Handcraft from a fad of the month club. Looked like fun. There were different kits, one to make your own gilded birdcage planter, one to make a little dustbin with hand painted designs, and one for Christmas.
It took me over six trips going up three flights of stairs to get barely half of it into the van we borrowed from my aunt. I was a bit of a stinker and left the rest there since it wasn't of much use to me. I didn't need a beat up old lamp or chair.
Well when all is said and done I sit with my parents and find out my dad got me the sewing stand I wanted that I spoke of earlier. Plus they bundled it with something else! So When I get home I take a look what's in the box. I found old buttons. Which is just perfect! If you love to knit or crochet having that odd button around to decorate your work is fantastic and gives it that one of a kind feeling. I filled almost an entire organizer tray with these buttons.
All in all I'd like to say it was a great day for crafting.
Here's the pictures of what I got from my auction hunting ^__^
![]()
![]()
![]()
![]()
![]()
![]()
![]()
![]()
![]()
![]()
![]()
![]()
![]()
Here are the instructions for one of the crafts this is for the gilded cage. I hope to do this one. I'm praying the supplies are still usable.
So you can see that you can get lots of neat craft supplies at an auction. In total we spent approximately $40. And the stuff I found are worth more than that. So give it a try guys!
I did and loved it!
If you do let me know how it went : )
Coming Soon!
The Nerd Blanket: Remember my last post about the TV crochet blanket?
Well I couldn't get the pieces photographed....by the time I was finished I was so bound and determined to start piecing it together that I completely forgot to take a picture. I'm half way putting it together. When it's done I'll take a picture for you guys I promise : )
I just wanted to share with you something that I personally love to do. I love going to auctions. Someone else's stuff can become your new found treasure ^.^ Examples I replaced my family's dishes from auction purchases. About two weeks ago I went to an auction and the prices were fantastic. I literally got 4 boxes of dishes each box being a buck a piece. I basically ended up with two brand new sets. One being a brand called GibsonUSA and a set of plain white Corelle dishes. It was wonderful.
Depending on the style of dishware or cooking utensils and on how your auctioneer handles his work, you could be walking off with some great stuff and all dirt cheap. The only ones I see going for insane prices are cast iron skillets and pots depending on their condition but still worth trying to buy. Also different sets of cookware that are much older like the 40's and 50's and earlier where they were really well crafted pieces.
Example I bought an electric waffle maker for $3 at the same auction I got my dishes, now I used to have a brand new one from Wal-Mart but it was terrible the pieces didn't come out for you to clean them so I was stuck making pathetic attempts at cleaning an electrical appliance then being terrified to plug it in the next time.
The model I got at the auction is older, made out of full metal and only rubbery/plastic handles. It also has one of those neat old time cords. BUT the best part of it is that the iron is detachable by screw. Meaning I can actually wash it and not worry about getting the entire machine wet. Yay for not having to fear electrocution as much!
Now a fun and exciting tip for my fellow crafters!
Did you know you can get craft supplies at an auction???
When I realized this it was the best day ever.
Some auctions are from older couples who are either moving away, moving into a home, or sadly they have passed away. While this can be very sad you can personally make sure their love of crafting goes on. Let them see your excitement over their collection of old buttons and fabric. It might spark some conversation on some of their old projects, share ideas. A crafter is always a crafter! When I'm old decrepit and incapable of doing crafts I hope to God there will be someone young willing to ask me about my old projects and ask me about techniques. It at least lets you enjoy what you used to do and love through conversation.
Depending on what it is your craft supplies can go at dirt cheap prices at an auction.
Collectible items or magazines can be pricey especially if there is another fellow crafter going after the same thing. I've had my dad bid for me just because he's better at it so I didn't completely lose without a fight.
Today (July 14, 2012) I went to another auction and hit the mother load. And I took some pictures to share with you all ^.^
But first here's the story of my auction today.
I got there bright and early at 8am to just see everything up for auction. Now I had my eyes on this little sewing thread holder. It's made out of wood, the top has a pin cushion attached, and it came with wooden spools....and we all know you don't really see those anymore for sale in stores. But while looking around I decided to visit the attic, the attic had EVERYTHING from books to dressers etc. But in the very corner there was some sewing and quilting supplies. It looked like a small stash and I thought it'd be fun to try and get it.
Well by the time that lot came up it was between me and another lady. The starting bid was $3 and we battled until I won at $20. Now thinking it's such a small stash I could just whisk it away no problem....now here's where the fun began. I get informed by the auctioneer I did not just bid on this small stash but the ENTIRE corner of the attic which is supposedly all sewing supplies. So I go look.
It's covered in junk. Papers and plastic bags everywhere. I did out old foam padding for cushions, so old it was unusable. I did find some nice strips of quilting pieces to play with. I've always had an urge to make a quilt and thought it'd be something fun to practice with. So I set that aside....then diving deeper into the giant pile I find more remnants of quilt pieces....which they should have pitched. I was fine I kept diving. Out of a massive pile of what I can personally call crafters leftover and unusable trash I found some good pieces.
Two bolts of old upholstery fabric. I have 2 dogs so they are so getting new pillows out of that if the fabric holds up. Good value there. Plus all the quilt pieces I could use, bags upon bags of those in blues, yellows and reds, old knitting magazines, a crochet hook NEVER out of the packaging, and crafts from what I can see being the 60's. The titles on the bags are "Gift Craft Unlimited" which is from National Handcraft from a fad of the month club. Looked like fun. There were different kits, one to make your own gilded birdcage planter, one to make a little dustbin with hand painted designs, and one for Christmas.
It took me over six trips going up three flights of stairs to get barely half of it into the van we borrowed from my aunt. I was a bit of a stinker and left the rest there since it wasn't of much use to me. I didn't need a beat up old lamp or chair.
Well when all is said and done I sit with my parents and find out my dad got me the sewing stand I wanted that I spoke of earlier. Plus they bundled it with something else! So When I get home I take a look what's in the box. I found old buttons. Which is just perfect! If you love to knit or crochet having that odd button around to decorate your work is fantastic and gives it that one of a kind feeling. I filled almost an entire organizer tray with these buttons.
All in all I'd like to say it was a great day for crafting.
Here's the pictures of what I got from my auction hunting ^__^

The previous owner kept her buttons in her old prescription bottles.
I found some as far back as the 60's and it was nice to open them.
They were so not child proof ^^;


An old wood container for sewing needles from The Boye Needle Co.

This was a misc. container which various needles mostly larger sizes and as luck would have it a small crochet hook ^.^

I'm only 25 years old and I never saw a metal portable tums container and I just think it's neat.
Plus it has sewing needles

These two came with the sewing stand.

This is a crochet hook from a brand called Marcia Lynn.
Interesting to see how much these cost back then, 29 cents!
Apparently this was on sale for 24 cents at Ames then.

I love to knit and I never get to see this type of needle in stores.
My aunt always told me about them and even showed me her own pair.
Always tried to find my own but never had any luck.
Now they're mine all mine!

I love knitting older knitting books.
The styles are still cute I don't care what popular teens say!
Plus the children’s designs are just adorable!

Here's that stand I told you about, I just love it ^.^

Here's inside one of the magazines.
Might I add that some of these patterns I have never seen in newer books.
I find them to be wonderful and should be brought back

While going through my purchases I found that the previous owner saved this little magazine clipping.
Telling young ladies how they can make their own wardrobe in about week!
Ladies do you see any knit dresses that look familiar?
Seriously find the patterns pick your favorite colors and make them!
I believe in the long run they'll be far cheaper than when you get them at the store.
Because by the time you get them on sale it's no longer fall or winter.

Here's what one of the little crafts I found looked like. They’re all neatly packaged.
Some of them have the paint with them. I assume the paint is too old and will just have to use what acrylic paints I have.
Still looks like fun.

Here are the instructions for one of the crafts this is for the gilded cage. I hope to do this one. I'm praying the supplies are still usable.
So you can see that you can get lots of neat craft supplies at an auction. In total we spent approximately $40. And the stuff I found are worth more than that. So give it a try guys!
I did and loved it!
If you do let me know how it went : )
Coming Soon!
The Nerd Blanket: Remember my last post about the TV crochet blanket?
Well I couldn't get the pieces photographed....by the time I was finished I was so bound and determined to start piecing it together that I completely forgot to take a picture. I'm half way putting it together. When it's done I'll take a picture for you guys I promise : )
Tuesday, June 19, 2012
Blanket plans
Hi everyone!
Long time no blog life's been very stressful but happy to be back : )
I'm experimenting with a new project. My best friends birthday is coming up and I'm crocheting her a blanket
The pattern is from the book happy hooker. From the stitch and bitch series. It's the blanket with the tv design. If you're a 80s or 90s
kid you'll remember that lovely set of colors going up on your tv when the tv or VCR went out.
Being the nerd that I am I couldn't pass it up. Plus in the book they give you a link to a site that will graph out pictures for you so you can knit crochet or cross stitch them : ) I had a lot of fun playing with it. I'll post the link to it soon plus a picture of one of the ones I picked to play with.
The pattern is pretty simple it's the very basic granny square.
You need to make so many squares of each color
21white
14yellow
14light blue
14 green
14 pink
14 red
14 dark blue
9 grey
9 purple
17 black
Each red heart skein made close to 14 squares for me but it all depends on how tight or lose your work tends to be
Now I'm all for budgets and not over spending. The book states specific colors and yarn types. I am personally using red heart brand yarn I got from Walmart for 2.77 a skein
I'm also using a different sized hook I'm using a 6.50 mm hook.
I'm almost half way through the squares I finished my pink purple dark blue and I'm half way through red and yellow. I'm excited!
Plus I've decided after I'm done and piece it together if I don't think it's large enough I'll use my left over yarn from my stash to make a border around it to enlarge it.
I'm volunteering today at Saint Vincent College at the basilica gift shop
It gave me a chance to make some squares....6 in about an hour I don't know if that makes me a slow crocheter or what ^^;
I think they're turning out ok I hope to post a pic of all my squares finished before I put them together
Well hope someone gives this a try and if you have let me know how yours went : )
Saturday, January 7, 2012
Nepeta Pillow Case ProtoType For Sale!
Hi Everyone!
I'm going to be posting this lovely pillow case on etsy on Sunday January 8, 2012.
It is my prototype for future nepeta inspired pillowcases.
Face it people if you cosplay as Nepeta and you travel to your Cons you need to have an awesome Nepeta pillowcase to sleep in style : )


It is a standard sized pillowcase. In a nice shade of green, the embroidery is a different shade of green although the picture likes to show otherwise. I also have done a nice edging with green beadings : )
Stitching in some of the symbols varies, this was done on purpose. The symbols are smaller on top and become larger as it goes down as well.
Pillowcase is machine washable and dryer safe as long as not on high heat. Permanent Press is ideal.
This fun pillowcase is going for $10! That's pretty cheap : ) Not bad for hand embroidery. It is only available for sale in the United States and shipping cost is $3.
When it's purchased I'll ship out ASAP. It will be washed and neatly ironed and packaged safely : )
Come on you know you want to be the one at cosplays saying "well ya? you have a pillowcase too? well FANTASMA sold me the prototype, the ORIGINAL!" It even comes with a sewn on victorian shaped button to know it was from me : ) If you don't wish to have it on it is easily removeable.
Even if you're not a Home Stuck fan if this is your Zodiac sign it's nice to have : )
I'm going to be posting this lovely pillow case on etsy on Sunday January 8, 2012.
It is my prototype for future nepeta inspired pillowcases.
Face it people if you cosplay as Nepeta and you travel to your Cons you need to have an awesome Nepeta pillowcase to sleep in style : )

Could you tell I was so excited to finish this that I took the picture after taking it right out of the embroidery hoop?.....ya I was excited, I think this is pretty!


It is a standard sized pillowcase. In a nice shade of green, the embroidery is a different shade of green although the picture likes to show otherwise. I also have done a nice edging with green beadings : )
Stitching in some of the symbols varies, this was done on purpose. The symbols are smaller on top and become larger as it goes down as well.
Pillowcase is machine washable and dryer safe as long as not on high heat. Permanent Press is ideal.
This fun pillowcase is going for $10! That's pretty cheap : ) Not bad for hand embroidery. It is only available for sale in the United States and shipping cost is $3.
When it's purchased I'll ship out ASAP. It will be washed and neatly ironed and packaged safely : )
Come on you know you want to be the one at cosplays saying "well ya? you have a pillowcase too? well FANTASMA sold me the prototype, the ORIGINAL!" It even comes with a sewn on victorian shaped button to know it was from me : ) If you don't wish to have it on it is easily removeable.
Even if you're not a Home Stuck fan if this is your Zodiac sign it's nice to have : )
Monday, January 2, 2012
nepeta leijon pillowcase
Hi everyone!
I've been embroidering up a storm. The nepeta pillowcase is almost done, yay!
Pctures to come soon. Green on green with a crocheted edging ^.^
mspaint adventure etsy work
Hi everyone!
I have a etsy question for you all. To all the MSPaintAdventure enthusiasts I'm going to be selling Embroidered pillowcases. Each one will have a trolls symbol on it in their blood color.
Before I start them I would very much like to know if there is anyone interested.
I'm willing to do additions if anyone has any ideas
ex: an embroidered lusus like a crabdad
an embroidered troll face (only if my practice ones work out well enough)
I am also williing to knit eridan scarves if anyone wants one.
Only thing is I will only make them if anyone shows interest.
So please send a comment
Prices:
pillowcase: (color black) with blood colors $10 per pillowcase
pillowcase: (color white) with blood colors $10 per pillowcase
pillowcase: (other colors) with blood colors $10
pillowcase: (any color) all blood colors and symbols $12
scarf: eridan scarf $15 with or without fringe
Also even though the others don't wear scarves I can do scarves in their colors in various patterns
$15 for basic patterns $20 if they're lace patterns because they take more time and require a lot of patience.
Please feedback is desired :) thank you so much for your time
Also don't forget I am willing to do requests, just as long as they're not too insane hehe
I could do favorite quotes, I can put their names on them, I can put your names on them,
*jokes* anyone want a karkat vantas pillow that says "****a$$" ? hehe
Maybe an embroidered black turtle neck with the cancer symbol?
Thank you ^.^ hope to hear from you soon!
Sorry
Hi everyone,
I just want to apologize for not getting out my christmas baking recipes out.
I had a family crisis, my grandfather passed away and I took it very hard. I also sadly got sick right after Christmas. So all in all December seems to be becoming the anti fantasma month...I hope it decides to like me next time around.
Subscribe to:
Posts (Atom)